WHITE PAPER
IMPROVE LASER SYSTEM PRODUCTIVITY WITH EMBEDDED PROCESS CONTROL
Laser-based production processes offer speed, quality, and cost advantages over other manufacturing technologies in many instances. But, fully realizing the benefits of a laser process requires careful monitoring and control – before, during, and after it is performed. This document reviews some of the methods and specific tools available for implementing this type of process control.
Any type of manufacturing process is subject to variations and will therefore sometimes yield unsatisfactory results. For a laser process, problems can occur with the laser source itself, due to alignment, damage, or contamination issues with the optics and beam delivery system, from errors with part handling and positioning, and more. Laser process results can also vary when there are inconsistencies in part material composition or dimensions, or significant changes in the ambient operating environment. And, of course, there’s always operator error.
The goal of process control is to identify, and possibly correct, any of these issues as early as possible. Ideally, this should occur before any bad parts are made, or at least before very many of them are produced. And it should always occur before out-of-specification product is shipped to customers.
Obviously, process control is used to improve quality, but it also saves money by reducing scrap and rework and minimizing material wastage. Additionally, there are other less obvious ways in which effective process control cuts costs.
One of these is the use of data collected by process control instrumentation to help analyze machine utilization. This information can then be applied to improve overall production efficiency and achieve a quicker return on investment for the laser system itself. Another benefit is the reduction in cost connected with possible liability or recall costs if bad product reaches the end user.
Finally, process control, and the data derived from it, can be essential in meeting the compliance requirements now present in many industries. Increasingly, meeting compliance standards requires recording laser and other system parameters for production batches, or even every individual part.

When to implement process control
A comprehensively implemented process control regimen involves inspection and data collection at every phase of the laser process. This can be broken down into four broad areas:
- Pre-process control
- In-process monitoring and control
- Post-process control
- Periodic system control
At each of these stages, there are typically a variety of options available in terms of process control instrumentation and specifics of implementation. The user must decide which measurements are necessary or useful, and to what extent they will affect quality and throughput. This, of course, must be weighed against the cost of each. It’s worth examining each of these stages individually to review what tools are available, and what benefits they potentially bring.
Pre-process control
Woodworkers have an old saying; “Measure twice, cut once.” This rubric expresses the idea that it’s better to prevent an error from occurring than to fix it later. And the earlier that issues are identified in production the better. Thus, making pre-process measurements is a particularly effective way to reduce errors, scrap, and rework.
For laser processes, pre-process measurements are typically first used to verify that the correct parts have been loaded. This may be accomplished by examining part size/shape, or by reading a barcode or other identifying mark present on the part. Additionally, part dimensions and orientation can be measured, and the precise position for processing can be located. For laser marking, it is also quite common for the system to receive variable input data (serial number, lot number, and other identifying information) from other manufacturing systems at this stage.
The most common instrumentation used for these kinds of measurements is a camera-based vision and pattern recognition system. This may be accompanied by specialized illumination accessories.
Typically, a vision system will use edge detection to validate the presence of the part and determine its precise position. It may also identify certain specific features or structures on the part. For welding processes, the weld gap may be detected and measured to determine part fit-up. A focus position check may also be performed to ensure that the laser will be properly focused on the work surface.
To process parts with a 3D geometry (not simply flat), shape detection can be accomplished using a line scan camera together with motion in x and z axes. This is particularly useful for marking operations because some systems can now “pre-distort” a laser mark so that it appears correct on the final contoured surface. But successful operation of this type of system requires an accurate measurement of the shape and orientation of the part to be marked.
In-process monitoring and control
In-process monitoring is used for many tasks but is probably most critical for welding applications. This is because weld quality is quite sensitive to laser operating parameters. Furthermore, gaps or weak spots in a weld usually represent a total failure for the part, so there is little room for mistakes.
Several things need to be measured during welding. These include laser operating parameters, like output power, as well as beam position relative to the weld gap and proper focus. In metal welding, a variety of welding parameters like penetration depth, spatter, and voids, can also be sensed. For polymer welding, in particular, the temperature along the entire weld seam and the collapse height of the top part are usually measured.
Quite an array of instrumentation has been developed to perform all of these measurements. High-speed cameras and optical computer tomography (OCT) measurements are probably the most widely used techniques. Measurement of back reflected laser light, and the light emitted by the welding process itself, are also very useful probes. Additionally, acoustic monitoring can be a sensitive way to detect the state of the welding process within the material. Pyrometer-based laser power control and thermal imaging are frequently used, as well.
Post-process control
There are usually two primary goals of post-process control operations. First is to verify that the process was performed correctly, and that the part is within specification. Second is to log results in accordance with ISO and other standards. This may involve recording laser and other system parameters, as well as measurements of the finished part.
For metal welding, the same array of techniques as used during processing may be employed during the cool down phase, especially to detect the formation of any cracks. Again, this may include thermography and acoustic detection, amongst other means. Vision may be used to assess the overall weld geometry and alignment. Artificial intelligence (AI) and other machine learning are increasingly being employed with visions systems to assess part quality and even cosmetics. This allows a process to be more fully automated and makes it less operator-dependent and subjective.
Periodic system control
Periodic system control refers to operations performed between the times the system is in active use. The purpose of these is to gauge the health of the system, independent of any specific operation, and to make any necessary adjustments. This is also the point at which data relating to overall equipment efficiency (OEE) can be collected.
For a laser system, several beam related parameters should be assessed periodically. These include power, beam quality (M² and the identification of any hotspots or small-scale intensity variations), beam alignment, and focus position. Optical alignment and contamination of any optics within the beam path can also be identified at this point. These types of measurements are important for proper operation of the system, and also for minimizing system-to-system variations (and therefore improving production consistency).
Integrated software simplifies process control
In the past, users often added third party process control instrumentation to their laser systems. This complicated the optical, mechanical, electronic, and software integration of these accessories. And it often led to “finger pointing” amongst suppliers when the system didn’t work properly. But it is now increasingly common for the laser system provider to integrate all this functionality and supply it as a single, turnkey system.

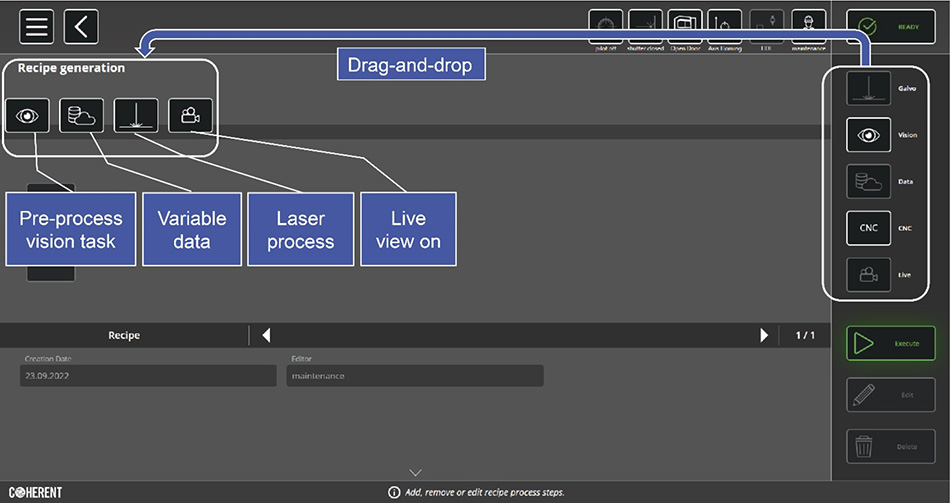
Figure 1: In Coherent Laser FrameWork, a job is created by dragging various inspection, process control, and processing tasks on to the timeline.
For example, Coherent offers process control instrumentation for all the functions just described on many of its laser welding, cutting, and marking machines. Coherent Laser FrameWork provides a unified software platform and machine interface that integrates and simplifies the use of all these tools. Various process control tasks – like pre-process inspection using vision, in-process monitoring of welding, and post-process beam diagnostics – can be specified along with laser parameters and part handling operations during job setup. The graphic shows how these are added to the process recipe using simple drag-and-drop functionality in Laser FrameWork.
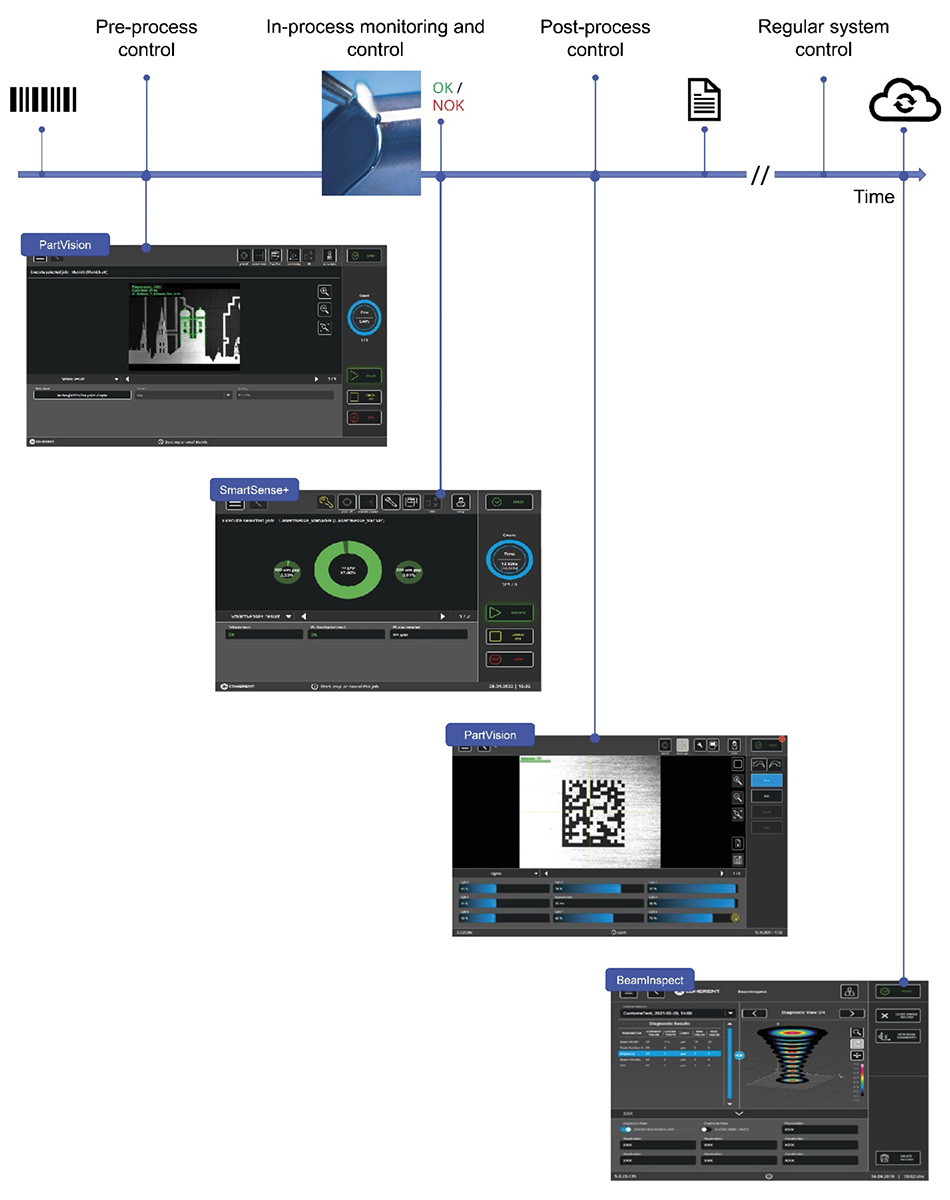
The next graphic shows how this functionality might be employed for a specific task – in this case a metal welding process. First, PartVision (a camera-based accessory) reads a part barcode to verify the correct part has been presented, and loads the proper process recipe into the machine. Next, the vision system identifies a feature on the part where welding is to occur.
The welding process itself is monitored using SmartSense+. This system incorporates optical detectors and acoustic sensors; it captures back-reflected laser light, plus light emitted by the process itself. It continually assesses welding process status, and immediately identifies any problems or defects.
PartVision is used post-process for part inspection. Then all of the process parameters and other relevant information are stored by the system.
Finally, between jobs, BeamInspect is used to assess the state and health of the laser beam. BeamInspect is an integrated laser beam diagnostic tool that performs precision, automated measurements and calculations of all the beam parameters that impact process results.

Figure 2: Example of a laser welding task specified using Laser FrameWork which incorporates inspection and process control tasks at every phase.
Conclusion
Continuing demands for laser processes to work faster, deliver higher precision, and have better yields necessitates process control at every stage of production. But this can create a high degree of complexity, making it difficult for manufacturers to successfully implement. Integrated systems with a unified software interface, like Laser FrameWork, can simplify this. Plus, they provide the user the simplicity and peace-of-mind of having a single source to interact with for set-up, training, and maintenance. All this brings the benefits of laser processing to a wider range of users.